In this article we will be looking at a step by step guide for developers on how to create a simple
question page using DSF’s reusable components.
When creating a new digital service for gov.cy, you can use our components for all your front-end needs. These components are consistent with the gov.cy design system and they can be easily implemented by anyone with basic front end development skills. They have been tested in different devices and browsers and improved based on user research findings.
Creating pages for gov.cy has never been easier. You can use our pre-built
css and javascript to create an HTML page with the necessary
head and
body sections and use one of the predefined
layouts. All you need to do is copy the code below and follow the instructions:
1. Download all the static assets
First things first, you will need to download all the static files needed from our design system:
In the examples used in this article and in our design system, the css and the images are organised in separate sub-folders, `/css` and `/img` respectively.
2. Create a web app manifest file
The web app manifest provides information about your service such as its name, icons, background and theme colour, in a JSON text file.
Create a `manifest.json` text file and add the following content.
{
"short_name": "Sample service",
"name": "Sample service - gov.cy",
"icons": [
{
"src": "/img/icons-128.png",
"type": "image/png",
"sizes": "128x128"
},
{
"src": "/img/icons-192.png",
"type": "image/png",
"sizes": "192x192"
},
{
"src": "/img/icons-512.png",
"type": "image/png",
"sizes": "512x512"
}
],
"start_url": ".",
"background_color": "#31576F",
"display": "browser",
"scope": "/",
"theme_color": "#31576F"
}
In a real service make sure to replace the following with your service details:
● "short_name": "Sample service",
● "name": "Sample service - gov.cy",
3. Create an html file
Create an html file and add the necessary head and body sections. Then inside the `<body>` add the section described in the page template page of our design system.
In our example we have created a file named `index.html`.All this code needs to be kept together in our file. At this point the file’s content looks like this:
<!doctype html>
<html lang="el">
<head>
<!-- Required meta tags -->
<meta charset="utf-8">
<meta name="viewport" content="width=device-width, initial-scale=1">
<!-- Social -->
<meta property="og:description" content="This is an example of a sample question page for a gov.cy service ">
<meta property="og:title" content="Where do you live? - Sample service - gov.cy">
<meta property="og:url" content="https://SERVICE_URL">
<meta property="og:type" content="website">
<meta property="og:image" content="/img/icons-512.png">
<meta property="og:site_name" content="GOV.CY">
<meta property="twitter:card" content="summary_large_image">
<meta property="twitter:url" content="https://SERVICE_URL">
<meta property="twitter:title" content="Where do you live? - Sample service - gov.cy">
<meta property="twitter:description" content="This is an example of a sample question page for a gov.cy service ">
<meta property="twitter:image" content="/img/icons-512.png">
<!-- Theme -->
<link rel="manifest" href="/manifest.json">
<meta name="theme-color" content="#31576F">
<link rel="icon" type="image/png" sizes="48x48" href="img/favicon-48x48.png">
<link rel="icon" type="image/png" sizes="32x32" href="img/favicon-32x32.png">
<link rel="icon" type="image/png" sizes="16x16" href="img/favicon-16x16.png">
<link rel="apple-touch-icon-precomposed" sizes="144x144" href="img/apple-touch-icon-144x144-precomposed.png">
<link rel="apple-touch-icon-precomposed" sizes="120x120" href="img/apple-touch-icon-120x120-precomposed.png">
<link rel="apple-touch-icon-precomposed" sizes="114x114" href="img/apple-touch-icon-114x114-precomposed.png">
<link rel="apple-touch-icon-precomposed" sizes="72x72" href="img/apple-touch-icon-72x72-precomposed.png">
<link rel="apple-touch-icon-precomposed" href="img/apple-touch-icon-57x57-precomposed.png">
<!-- CSS -->
<link href="css/main.min.css" rel="stylesheet" >
<title>Where do you live? - Sample service - gov.cy</title>
<meta name="description" content="This is an example of a sample question page for a gov.cy service ">
</head>
<body>
<a href="#mainContainer" class="govcy-skip-link">Skip to main content</a>
<!--bodyStart-->
<section class="govcy-container-fluid" id="bodyStartContainer"> </section>
<!--Header-->
<section class="govcy-container-fluid govcy-p-0 govcy-m-0 govcy-position-relative govcy-d-print-none">
<div class="govcy-container" id="headerContainer"></div>
</section>
<!--beforeMain-->
<section class="govcy-container govcy-mb-4" id="beforeMainContainer"> </section>
<!--main-->
<main class="govcy-container" id="mainContainer"> </main>
<!-- Footer -->
<section class="govcy-container-fluid govcy-br-top-8 govcy-br-top-primary govcy-p-3 govcy-bg-light govcy-d-print-none">
<div class="govcy-container" id="footerContainer"></div>
</section>
<!--bodyEnd-->
<section class="govcy-container-fluid" id="bodyEndContainer"> </section>
<!-- Option 1: Bootstrap Bundle with Popper -->
<script src="https://cdn.jsdelivr.net/npm/bootstrap@5.1.3/dist/js/bootstrap.bundle.min.js" integrity="sha384-ka7Sk0Gln4gmtz2MlQnikT1wXgYsOg+OMhuP+IlRH9sENBO0LRn5q+8nbTov4+1p" crossorigin="anonymous"></script>
</body>
</html>
In a real service make sure to replace the following with your service details:
● Update the content of the following tags with your service URL start page
● Update the content of the following tags with your page title
○ <meta property="og:title" content="Where do you live? - Sample service - gov.cy">
○ <meta property="twitter:title" content="Where do you live? - Sample service - gov.cy">
○ <title>Where do you live? - Sample service - gov.cy</title>
● Update content the content of the following tags with your service description
○ <meta property="og:description" content="This is an example of a sample question page for a gov.cy service ">
○ <meta property="twitter:description" content="This is an example of a sample question page for a gov.cy service ">
○ <meta name="description" content="This is an example of a sample question page for a gov.cy service ">
Visually, the page looks like this right now:
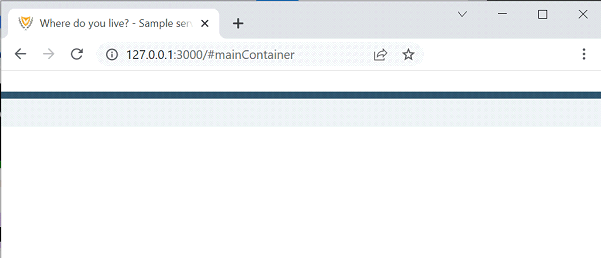
It doesn’t look like much now but we’ll get there soon.
4. Add the desired layout
You can now add the desired layout in your html file, inside the `<main>` section. We recommend using the Two-Thirds layout unless your user research or testing shows you need a different layout.
This is what the `<main>` section looks like at this point:
<!--main-->
<main class="govcy-container" id="mainContainer">
<div class="row">
<article class="govcy-col-8">Main</article>
</div>
</main>
Visually our page right now looks like this

It still is not much to look at but be patient, we are getting there.
5. Add components and patterns
We can now add our design elements and include content in our page. First we will start with the basics, that is all the components most gov.cy pages should have.
Header
Add code to inside the header section of the body for a header component.
This is what the header section looks like now:
<!--Header-->
<section class="govcy-container-fluid govcy-p-0 govcy-m-0 govcy-position-relative govcy-d-print-none">
<div class="govcy-container" id="headerContainer">
<div class="row">
<header class="govcy-header govcy-bg-primary govcy-text-white govcy-bg-primary-right">
<a href="#" class="govcy-logo"> <img></a>
<form class="govcy-text-white govcy-bg-primary" novalidate>
<select name="govcy-lang-menu" class="govcy-lang-menu govcy-text-white">
<option value="English">English</option>
<option value="Greek">Ελληνικά</option>
</select>
</form>
<span class="govcy-service-name">Sample service</span>
</header>
</div>
</div>
</section>
In a real service make sure to replace the service name and add functionality to change language.
Back link
Add code inside the `before main` section (<section id="before-main">) of the body for a back link.
This is what the before main section looks like now:
<!--beforeMain-->
<section class="govcy-container govcy-mb-4" id="beforeMainContainer">
<span class="bi bi-chevron-left"></span>
<a href="#" class="govcy-back-link">Back</a>
</section>
In a real service make sure to add functionality to your back link.
Footer
Add code inside the footer section of the body for a footer component.
This is what the footer section looks like now:
<!-- Footer -->
<section class="govcy-container-fluid govcy-br-top-8 govcy-br-top-primary govcy-p-3 govcy-bg-light govcy-d-print-none">
<div class="govcy-container" id="footerContainer">
<div class="row">
<footer class="govcy-footer">
<span class="govcy-d-inline-block govcy-valign-top govcy-pb-2"><img alt="govcy-logo"></span>
<ul class="govcy-d-inline-block govcy-m-0 govcy-pl-3 govcy-efs-medium">
<li><a href="#">Privacy statement</a></li>
<li><a href="#">Cookie policy</a></li>
<li><a href="#">Accessibility statement</a></li>
<li class="govcy-d-block govcy-text-dark">© Republic of Cyprus, 2022</li>
</ul>
</footer>
</div>
</div>
</section>
In a real service make sure to add real urls for all the links inside the footer.
Question page pattern
We can now use the question page pattern and add content in the `<main>` section to complete the page. We use the question page pattern when we are asking the user a question in the service.
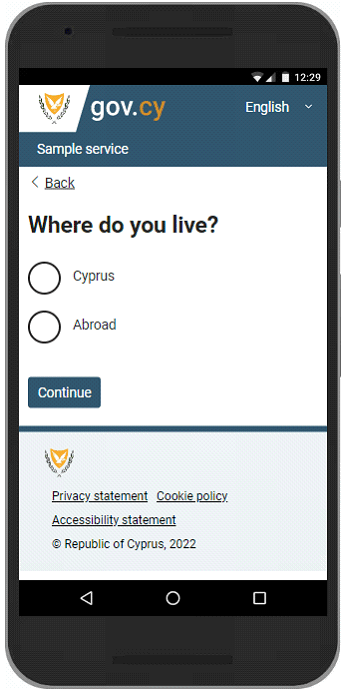
This is what the main section looks like now:
<!--main-->
<main class="govcy-container" id="mainContainer">
<div class="row">
<article class="govcy-col-8">
<form action="" class="govcy-form" novalidate="">
<fieldset class="govcy-fieldset govcy-mb-4">
<legend><h1>Where do you live?</h1></legend>
<div class="govcy-form-control">
<label class="govcy-radio">Cyprus
<input class="govcy-radio-input" type="radio" name="radio">
<span class="govcy-radio-checked"></span>
</label>
<label class="govcy-radio">Abroad
<input class="govcy-radio-input" type="radio" name="radio">
<span class="govcy-radio-checked"></span>
</label>
</div>
</fieldset>
<button type="button" class="govcy-btn-primary govcy-mb-4">Continue</button>
</form>
</article>
</div>
</main>
Notice that to create this question, we have used the following elements from the design system:
If you need an element that is not defined in the Design System library, there is an article outlining How to create new design elements using the gov.cy utility classes.
Finally our page visually looks like this now:

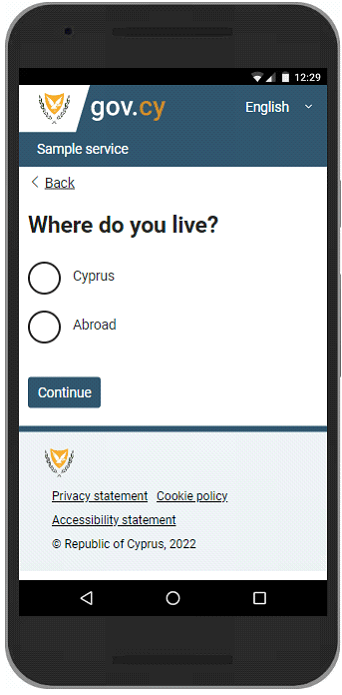
In a real service make sure to add functionality in the Continue button.
You can get all the files used in this example from
our github repository. You can also take a look at the end result
here.
So there you have it. All the steps and code you need to start building pages for gov.cy. For more information you can find guidance documentation here:
Service Standard
DMRID blogs
Contact details for DSF
Πώς να δημιουργήσετε μια σελίδα χρησιμοποιώντας το gov.cy design system
Σε αυτό το άρθρο θα εξετάσουμε βήμα προς βήμα πώς προγραμματιστές μπορούν να δημιουργήσουν μια απλή σελίδα ερωτήσεων, χρησιμοποιώντας τα reusable components.του DSF.
Όταν δημιουργείτε μια νέα ψηφιακή υπηρεσία για το gov.cy, μπορείτε να χρησιμοποιήσετε τα reusable components μας για όλες τις παρουσιαστικές σας ανάγκες. Τα components αυτά είναι συμβατά με το gov.cy design system και μπορούν να εφαρμοστούν εύκολα από οποιονδήποτε με βασικές δεξιότητες ανάπτυξης ιστοσελίδων. Έχουν επίσης δοκιμαστεί σε διάφορες συσκευές και προγράμματα περιήγησης και έχουν βελτιωθεί με βάση τα ευρήματα της έρευνας χρηστών.
<END INTRO>
Η δημιουργία σελίδων για το gov.cy δεν ήταν ποτέ ευκολότερη. Μπορείτε να χρησιμοποιήσετε το έτοιμο css και το javascript για να δημιουργήσετε μια σελίδα HTML με τα απαραίτητα τμήματα head και body και να χρησιμοποιήσετε ένα από τα προκαθορισμένα layouts. Το μόνο που χρειάζεται να κάνετε είναι να αντιγράψετε τον παρακάτω κώδικα και να ακολουθήσετε τις οδηγίες:
1. Κατεβάστε όλα τα στατικά στοιχεία (assets)
Πρώτα απ' όλα, θα πρέπει να κατεβάσετε όλα τα στατικά αρχεία που χρειάζεστε από το design system μας:
Στα παραδείγματα που χρησιμοποιείται σε αυτό το άρθρο και στο design system μας, το css και οι εικόνες οργανώνονται σε ξεχωριστούς υποφακέλους, `/css` και `/img` αντίστοιχα.
2. Δημιουργήστε ένα αρχείο web app manifest
Το web app manifest παρέχει πληροφορίες σχετικά με την υπηρεσία σας, όπως το όνομά της, τα εικονίδια, το φόντο και το χρώμα του θέματος σε ένα αρχείο κειμένου JSON.
Δημιουργήστε ένα αρχείο κειμένου `manifest.json` και προσθέστε το ακόλουθο περιεχόμενο.
{
"short_name": "Sample service",
"name": "Sample service - gov.cy",
"icons": [
{
"src": "/img/icons-128.png",
"type": "image/png",
"sizes": "128x128"
},
{
"src": "/img/icons-192.png",
"type": "image/png",
"sizes": "192x192"
},
{
"src": "/img/icons-512.png",
"type": "image/png",
"sizes": "512x512"
}
],
"start_url": ".",
"background_color": "#31576F",
"display": "browser",
"scope": "/",
"theme_color": "#31576F"
}
Σε μια πραγματική υπηρεσία φροντίστε να αντικαταστήσετε τα ακόλουθα με τα στοιχεία της υπηρεσίας σας:
● "short_name": "Sample service",
● "name": "Sample service - gov.cy",
3. Δημιουργήστε ένα αρχείο html
Δημιουργήστε ένα αρχείο html και προσθέστε τα απαραίτητα τμήματα head και body. Στη συνέχεια, μέσα στο `<body>` προσθέστε το τμήμα που περιγράφεται στη σελίδα page template του design system μας.
Στο παράδειγμά μας έχουμε δημιουργήσει ένα αρχείο με όνομα `index.html`.Όλος αυτός ο κώδικας πρέπει να διατηρηθεί μαζί στο αρχείο μας. Σε αυτό το σημείο το περιεχόμενο του αρχείου μοιάζει ως εξής:
<!doctype html>
<html lang="el">
<head>
<!-- Required meta tags -->
<meta charset="utf-8">
<meta name="viewport" content="width=device-width, initial-scale=1">
<!-- Social -->
<meta property="og:description" content="This is an example of a sample question page for a gov.cy service ">
<meta property="og:title" content="Where do you live? - Sample service - gov.cy">
<meta property="og:url" content="https://SERVICE_URL">
<meta property="og:type" content="website">
<meta property="og:image" content="/img/icons-512.png">
<meta property="og:site_name" content="GOV.CY">
<meta property="twitter:card" content="summary_large_image">
<meta property="twitter:url" content="https://SERVICE_URL">
<meta property="twitter:title" content="Where do you live? - Sample service - gov.cy">
<meta property="twitter:description" content="This is an example of a sample question page for a gov.cy service ">
<meta property="twitter:image" content="/img/icons-512.png">
<!-- Theme -->
<link rel="manifest" href="/manifest.json">
<meta name="theme-color" content="#31576F">
<link rel="icon" type="image/png" sizes="48x48" href="img/favicon-48x48.png">
<link rel="icon" type="image/png" sizes="32x32" href="img/favicon-32x32.png">
<link rel="icon" type="image/png" sizes="16x16" href="img/favicon-16x16.png">
<link rel="apple-touch-icon-precomposed" sizes="144x144" href="img/apple-touch-icon-144x144-precomposed.png">
<link rel="apple-touch-icon-precomposed" sizes="120x120" href="img/apple-touch-icon-120x120-precomposed.png">
<link rel="apple-touch-icon-precomposed" sizes="114x114" href="img/apple-touch-icon-114x114-precomposed.png">
<link rel="apple-touch-icon-precomposed" sizes="72x72" href="img/apple-touch-icon-72x72-precomposed.png">
<link rel="apple-touch-icon-precomposed" href="img/apple-touch-icon-57x57-precomposed.png">
<!-- CSS -->
<link href="css/main.min.css" rel="stylesheet" >
<title>Where do you live? - Sample service - gov.cy</title>
<meta name="description" content="This is an example of a sample question page for a gov.cy service ">
</head>
<body>
<a href="#mainContainer" class="govcy-skip-link">Skip to main content</a>
<!--bodyStart-->
<section class="govcy-container-fluid" id="bodyStartContainer"> </section>
<!--Header-->
<section class="govcy-container-fluid govcy-p-0 govcy-m-0 govcy-position-relative govcy-d-print-none">
<div class="govcy-container" id="headerContainer"></div>
</section>
<!--beforeMain-->
<section class="govcy-container govcy-mb-4" id="beforeMainContainer"> </section>
<!--main-->
<main class="govcy-container" id="mainContainer"> </main>
<!-- Footer -->
<section class="govcy-container-fluid govcy-br-top-8 govcy-br-top-primary govcy-p-3 govcy-bg-light govcy-d-print-none">
<div class="govcy-container" id="footerContainer"></div>
</section>
<!--bodyEnd-->
<section class="govcy-container-fluid" id="bodyEndContainer"> </section>
<!-- Option 1: Bootstrap Bundle with Popper -->
<script src="https://cdn.jsdelivr.net/npm/bootstrap@5.1.3/dist/js/bootstrap.bundle.min.js" integrity="sha384-ka7Sk0Gln4gmtz2MlQnikT1wXgYsOg+OMhuP+IlRH9sENBO0LRn5q+8nbTov4+1p" crossorigin="anonymous"></script>
</body>
</html>
Σε μια πραγματική υπηρεσία φροντίστε να αντικαταστήσετε τα ακόλουθα με τα στοιχεία της υπηρεσίας σας:
● Ενημερώστε το περιεχόμενο των ακόλουθων tags με την αρχική σελίδα URL της υπηρεσίας σας
● Ενημερώστε το περιεχόμενο των ακόλουθων tags με τον τίτλο της σελίδας σας
○ <meta property="og:title" content="Where do you live? - Sample service - gov.cy">
○ <meta property="twitter:title" content="Where do you live? - Sample service - gov.cy">
○ <title>Where do you live? - Sample service - gov.cy</title>
● Ενημερώστε το περιεχόμενο των ακόλουθων tags με την περιγραφή της υπηρεσίας σας
○ <meta property="og:description" content="This is an example of a sample question page for a gov.cy service ">
○ <meta property="twitter:description" content="This is an example of a sample question page for a gov.cy service ">
○ <meta name="description" content="This is an example of a sample question page for a gov.cy service ">
Οπτικά, η σελίδα μοιάζει κάπως έτσι αυτή τη στιγμή:
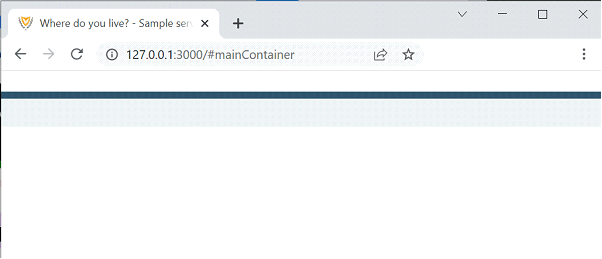
Δεν φαίνεται πολύ σπουδαία η σελίδα μας τώρα, αλλά σύντομα θα πάρει την μορφή της.
4. Προσθέστε την επιθυμητή διάταξη (layout)
Μπορείτε τώρα να προσθέσετε την επιθυμητή διάταξη (layout) στο αρχείο html, μέσα στην ενότητα `<main>`. Συνιστούμε να χρησιμοποιήσετε τη διάταξη Two-Thirds, εκτός αν η έρευνα ή η δοκιμή των χρηστών σας, έχει δείξει ότι χρειάζεστε μια διαφορετική διάταξη.
Σε αυτό το σημείο το περιεχόμενο του τμήματος `<main>` μοιάζει ως εξής:
<!--main-->
<main class="govcy-container" id="mainContainer">
<div class="row">
<article class="govcy-col-8">Main</article>
</div>
</main>
Οπτικά, η σελίδα μοιάζει κάπως έτσι αυτή τη στιγμή:

Εξακολουθεί να μην είναι κάτι το ιδιαίτερο, αλλά κάντε υπομονή, φτάνουμε εκεί.
5. Προσθήκη components και patterns
Μπορούμε τώρα να προσθέσουμε τα στοιχεία σχεδιασμού μας και να συμπεριλάβουμε περιεχόμενο στη σελίδα μας. Πρώτα θα ξεκινήσουμε με τα βασικά, δηλαδή όλα τα στοιχεία (components) που πρέπει να έχουν οι περισσότερες σελίδες του gov.cy.
Header
Προσθέστε κώδικα μέσα στο header section του `<body>` για ένα header component.
Σε αυτό το σημείο το περιεχόμενο της ενότητας header section μοιάζει ως εξής:
<!--Header-->
<section class="govcy-container-fluid govcy-p-0 govcy-m-0 govcy-position-relative govcy-d-print-none">
<div class="govcy-container" id="headerContainer">
<div class="row">
<header class="govcy-header govcy-bg-primary govcy-text-white govcy-bg-primary-right">
<a href="#" class="govcy-logo"> <img></a>
<form class="govcy-text-white govcy-bg-primary" novalidate>
<select name="govcy-lang-menu" class="govcy-lang-menu govcy-text-white">
<option value="English">English</option>
<option value="Greek">Ελληνικά</option>
</select>
</form>
<span class="govcy-service-name">Sample service</span>
</header>
</div>
</div>
</section>
Σε μια πραγματική υπηρεσία φροντίστε να αντικαταστήσετε το όνομα της υπηρεσίας και να προσθέσετε λειτουργικότητα για την αλλαγή γλώσσας.
Back link
Προσθέστε κώδικα μέσα στην ενότητα `before main` (<section id="before-main">) του `<body>` για ένα back link.
Σε αυτό το σημείο το περιεχόμενο της ενότητας before main μοιάζει ως εξής:
<!--beforeMain-->
<section class="govcy-container govcy-mb-4" id="beforeMainContainer">
<span class="bi bi-chevron-left"></span>
<a href="#" class="govcy-back-link">Back</a>
</section>
Σε μια πραγματική υπηρεσία φροντίστε να προσθέσετε λειτουργικότητα στο back link.
Footer
Προσθέστε κώδικα μέσα στην ενότητα footer του `<body>` για ένα footer component.
Σε αυτό το σημείο το περιεχόμενο της ενότητας footer μοιάζει ως εξής:
<!-- Footer -->
<section class="govcy-container-fluid govcy-br-top-8 govcy-br-top-primary govcy-p-3 govcy-bg-light govcy-d-print-none">
<div class="govcy-container" id="footerContainer">
<div class="row">
<footer class="govcy-footer">
<span class="govcy-d-inline-block govcy-valign-top govcy-pb-2"><img alt="govcy-logo"></span>
<ul class="govcy-d-inline-block govcy-m-0 govcy-pl-3 govcy-efs-medium">
<li><a href="#">Privacy statement</a></li>
<li><a href="#">Cookie policy</a></li>
<li><a href="#">Accessibility statement</a></li>
<li class="govcy-d-block govcy-text-dark">© Republic of Cyprus, 2022</li>
</ul>
</footer>
</div>
</div>
</section>
Σε μια πραγματική υπηρεσία φροντίστε να προσθέσετε πραγματικά urls για όλους τους συνδέσμους μέσα στο footer.
Question page pattern
We can now use the question page pattern and add content in the `<main>` section to complete the page. We use the question page pattern when we are asking the user a question in the service.
Μπορούμε τώρα να χρησιμοποιήσουμε το πρότυπο σελίδας ερωτήσεων (question page pattern) και να προσθέσουμε περιεχόμενο στην ενότητα `<main>` για να ολοκληρώσουμε τη σελίδα. Χρησιμοποιούμε το μοτίβο question page pattern όταν θέτουμε στον χρήστη μια ερώτηση στην υπηρεσία.
Σε αυτό το σημείο το περιεχόμενο της ενότητας `<main>`μοιάζει ως εξής:
<!--main-->
<main class="govcy-container" id="mainContainer">
<div class="row">
<article class="govcy-col-8">
<form action="" class="govcy-form" novalidate="">
<fieldset class="govcy-fieldset govcy-mb-4">
<legend><h1>Where do you live?</h1></legend>
<div class="govcy-form-control">
<label class="govcy-radio">Cyprus
<input class="govcy-radio-input" type="radio" name="radio">
<span class="govcy-radio-checked"></span>
</label>
<label class="govcy-radio">Abroad
<input class="govcy-radio-input" type="radio" name="radio">
<span class="govcy-radio-checked"></span>
</label>
</div>
</fieldset>
<button type="button" class="govcy-btn-primary govcy-mb-4">Continue</button>
</form>
</article>
</div>
</main>
Παρατηρήστε ότι για τη δημιουργία αυτής της ερώτησης χρησιμοποιήσαμε τα ακόλουθα στοιχεία από το design system μας:
Αν χρειάζεστε ένα στοιχείο σχεδίασης που δεν έχει οριστεί στη βιβλιοθήκη του design system μας, υπάρχει ένα άρθρο που περιγράφει τον τρόπο δημιουργίας νέων στοιχείων σχεδίασης με τη χρήση των βοηθητικών κλάσεων gov.cy.
Τελικά η σελίδα μας οπτικά μοιάζει με αυτό
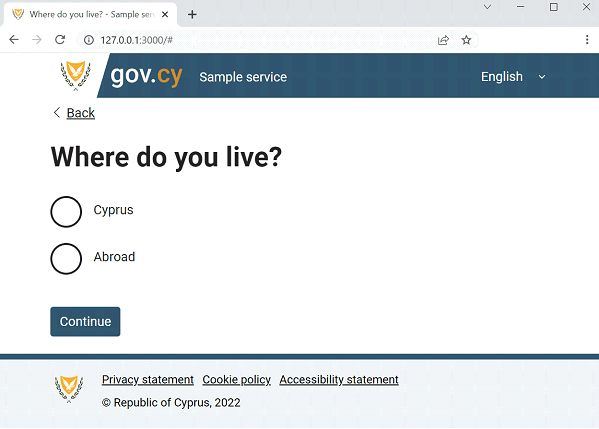
Σε μια πραγματική υπηρεσία φροντίστε να προσθέσετε λειτουργικότητα στο Continue button.
Μπορείτε να πάρετε όλα τα αρχεία που χρησιμοποιήθηκαν σε αυτό το παράδειγμα από το
github repository μας. Μπορείτε επίσης να ρίξετε μια ματιά στο
τελικό αποτέλεσμα εδώ.
Αυτά είναι όλα τα βήματα και ο κώδικας που χρειάζεστε για να ξεκινήσετε να φτιάχνετε σελίδες για το gov.cy. Για περισσότερες πληροφορίες μπορείτε να βρείτε καθοδήγηση εδώ:
Service Standard
DMRID blogs
Contact details for DSF