In this article we will be looking at an actual example for developers, of how to use the gov.cy utility classes to create a brand new HTML design element. If you would like to see an example of building a page using the Design System library and other tools, see article ‘How to create a page using the gov.cy design system’.
The gov.cy Design System provides the basic components for creating digital service straight out of the box. These components may not be enough to build all services end to end, so the DSF team has created a library of CSS utility classes that apply unique styling and formatting to a group of HTML elements, that can be used to build new design elements, in the ‘gov.cy way’.
We will be looking at how to create a “Testing banner” to warn users when a service is built, and being tested, but not available for the public to start using. Our team has found from user research and consulting with testing partners during the discovery and design phases that there was a need for a design element with a ‘badge like’ warning with the word “TESTING” and text explaining that this is a testing service, to be placed on the top of the `main` section of each page.
We start by creating a `<div>` container. In order to comply with the vertical spacing requirements of our design system we will assign the `govcy-mb-4` class in our `<div>`.
<div class=" govcy-mb-4"></div>
We can now create the ‘badge like’ element inside in our `<div>`. We can use a `<span>` inline container and assign the following classes to it:
● “govcy-br-2” class to add a 2px border in our element
● “govcy-br-primary” class to set the primary colour for the border
● “govcy-text-white” class to set the text to white
● “govcy-rounded-1” class to change the borders radius
● “govcy-bg-primary” class to set primary colour for the background
● “govcy-px-3” class to set the left and right padding to 3px
● “govcy-fw-bold” class to set font weight of text to bold
We can now simply add the rest of the text inside the `<div>`.
Our code now looks like this:
<div class=" govcy-mb-4">
<span class="govcy-br-2 govcy-text-white govcy-br-primary govcy-rounded-1 govcy-bg-primary govcy-px-3 govcy-fw-bold">TESTING</span>
This is not an actual gov.cy service. It is only used for testing purposes. Any submissions made though this service will not be processed.
</div>
Visually our element looks like this:
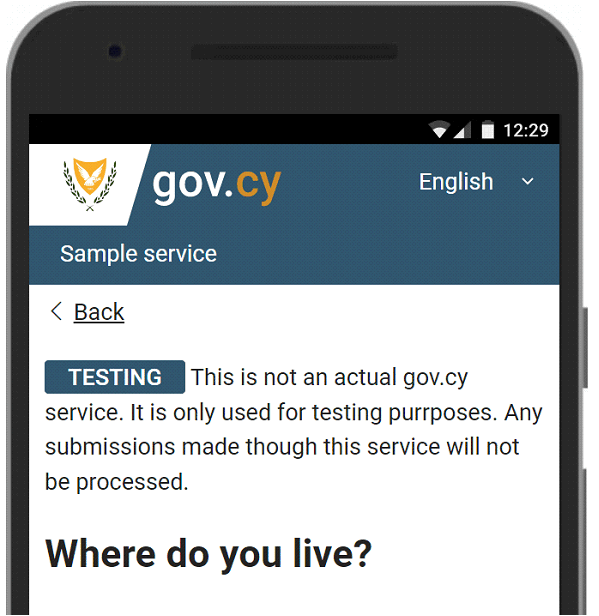
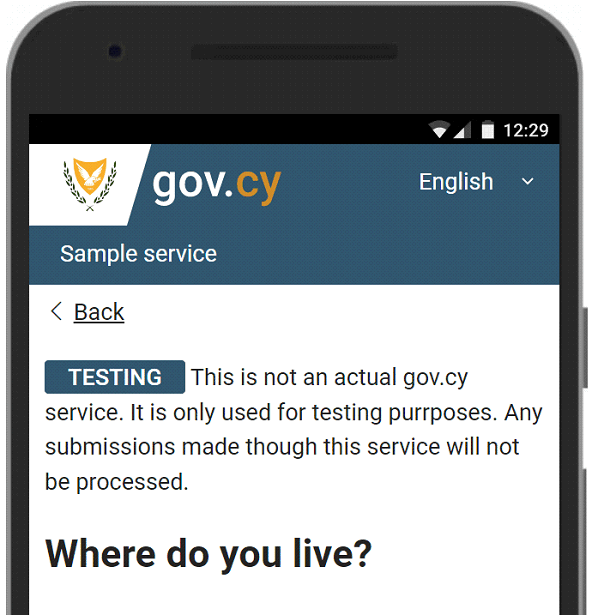
 This is how the element looks like placed first inside the `<main>` container of an actual page:
 This is it. We were able to easily create a new design element, aligned with the styles of gov.cy, meeting user needs, without writing any new styling code and this saves a lot of time.
Πώς να δημιουργήσετε νέα στοιχεία σχεδιασμού χρησιμοποιώντας τις βοηθητικές κλάσεις gov.cy
Σε αυτό το άρθρο θα εξετάσουμε ένα πραγματικό παράδειγμα για προγραμματιστές, για το πώς να χρησιμοποιήσετε τις βοηθητικές κλάσεις (utility classes) gov.cy για να δημιουργήσετε ένα ολοκαίνουργιο στοιχείο σχεδιασμού HTML. Αν θέλετε να δείτε ένα παράδειγμα δημιουργίας μιας σελίδας με τη χρήση της βιβλιοθήκης Design System και άλλων εργαλείων, δείτε το άρθρο 'Πώς να δημιουργήσετε μια σελίδα χρησιμοποιώντας το σύστημα σχεδιασμού gov.cy'
Το Design System παρέχει τα βασικά στοιχεία για τη δημιουργία ψηφιακών υπηρεσιών με επαναχρησιμοποιήσιμα στοιχεία (components). Αυτά τα στοιχεία μπορεί να μην είναι αρκετά για να δημιουργηθούν όλες οι υπηρεσίες σε όλες τις περιπτώσεις, γι' αυτό η ομάδα DSF δημιούργησε μια βιβλιοθήκη από βοηθητικές κλάσεις CSS που εφαρμόζουν μοναδικό στυλ και μορφοποίηση σε μια ομάδα στοιχείων HTML, τα οποία μπορούν να χρησιμοποιηθούν για τη δημιουργία νέων στοιχείων σχεδιασμού, με τον "τρόπο του gov.cy".
<END INTRO>
Θα εξετάσουμε τον τρόπο δημιουργίας ενός "Testing banner" για να προειδοποιούμε τους χρήστες όταν μια υπηρεσία έχει κατασκευαστεί και δοκιμάζεται, αλλά δεν είναι διαθέσιμη για το κοινό ώστε να αρχίσει να τη χρησιμοποιεί. Η ομάδα μας διαπίστωσε από την έρευνα χρηστών και τη διαβούλευση με τους συνεργάτες δοκιμών κατά τη διάρκεια των φάσεων ανακάλυψης και σχεδιασμού ότι υπήρχε ανάγκη για ένα στοιχείο σχεδιασμού με μια προειδοποίηση με τη λέξη "TESTING" και κείμενο που εξηγεί ότι πρόκειται για δοκιμαστική υπηρεσία, το οποίο θα τοποθετείται στην κορυφή της ενότητας `main` κάθε σελίδας.
Ξεκινάμε δημιουργώντας ένα `<div>` container. Προκειμένου να συμμορφωθούμε με τις απαιτήσεις κατακόρυφης απόστασης (vertical spacing) του design system μας, θα εκχωρήσουμε την κλάση `govcy-mb-4` στο `<div>` μας.
<div class=" govcy-mb-4"></div>
Μπορούμε τώρα να δημιουργήσουμε το στοιχείο μέσα στο `<div>` μας. Μπορούμε να χρησιμοποιήσουμε ένα `<span>` inline container και να του εκχωρήσουμε τις ακόλουθες κλάσεις:
● “govcy-br-2” κλάση για να προσθέσουμε ένα περίγραμμα 2px στο στοιχείο μας
● “govcy-br-primary” κλάση για να ορίσετε το primary colour για το περίγραμμα
● “govcy-text-white” κλάση για να ορίσετε το κείμενο σε λευκό
● “govcy-rounded-1” κλάση για να αλλάξετε την ακτίνα των συνόρων
● “govcy-bg-primary” κλάση για να ορίσετε το primary colour για το φόντο
● “govcy-px-3” κλάση για να ορίσετε την αριστερή και τη δεξιά γέμιση (padding) σε 3px
● “govcy-fw-bold” κλάση για να ορίσετε το βάρος της γραμματοσειράς του κειμένου σε έντονη
Τώρα μπορούμε απλά να προσθέσουμε το υπόλοιπο κείμενο μέσα στο `<div>`.
Σε αυτό το σημείο ο κώδικας μας μοιάζει ως εξής:
<div class=" govcy-mb-4">
<span class="govcy-br-2 govcy-text-white govcy-br-primary govcy-rounded-1 govcy-bg-primary govcy-px-3 govcy-fw-bold">TESTING</span>
This is not an actual gov.cy service. It is only used for testing purposes. Any submissions made though this service will not be processed.
</div>
Οπτικά το στοιχείο μας μοιάζει ως εξής:
 Έτσι φαίνεται το στοιχείο τοποθετημένο πρώτα μέσα στο `<main>` container μιας πραγματικής σελίδας:
 Αυτά είναι όλα τα βήματα. Καταφέραμε εύκολα να δημιουργήσουμε ένα νέο σχεδιαστικό στοιχείο, ευθυγραμμισμένο με το στυλ του gov.cy, που να ανταποκρίνεται στις ανάγκες των χρηστών, χωρίς να γράψουμε νέο κώδικα διαμόρφωσης και αυτό εξοικονομεί πολύ χρόνο.